Siding Repair When to DIY and When to Call a Pro – Siding Repair: When to DIY and When to Call a Pro – that’s the million-dollar question many homeowners grapple with. A seemingly simple crack can escalate into a costly nightmare if mishandled, while a complex repair might actually be more manageable than you think with the right approach. This guide will walk you through assessing siding damage, determining the feasibility of a DIY fix, and understanding when to call in the professionals.
We’ll cover everything from identifying common damage types and choosing the right tools to navigating contractor quotes and preventing future problems, ensuring you make informed decisions that save you time, money, and potential headaches.
We’ll explore the nuances of different siding materials, the costs involved in both DIY and professional repairs, and the crucial safety considerations that often get overlooked. By the end, you’ll have a clear understanding of your options and the confidence to tackle your siding repair project effectively.
Assessing Siding Damage
Siding, the protective outer layer of your home, takes a beating from the elements. Regular inspection is crucial for preventing minor issues from escalating into costly repairs. Understanding the types of damage, their severity, and the factors influencing repair complexity will empower you to make informed decisions – whether to tackle the job yourself or call in a professional.
This will save you time, money, and potential headaches down the line.
Identifying the extent of siding damage is the first step in any repair project. This involves a careful visual inspection of your entire home’s exterior, looking for signs of wear and tear. The more comprehensive your assessment, the better equipped you’ll be to plan your repair strategy.
Common Types of Siding Damage and Their Causes
Different types of siding damage vary in severity and require different approaches to repair. The table below Artikels common issues, their typical causes, and a general assessment of their complexity.
| Type of Damage | Severity | Typical Causes | Complexity of Repair |
|---|---|---|---|
| Cracks | Low to Moderate | Age, impact, temperature fluctuations, settling foundation | Relatively easy for small cracks; more complex for larger, deeper cracks. |
| Holes | Moderate to High | Impact damage (e.g., from branches, hail, or projectiles), animal activity, rot | Can range from simple patching to significant panel replacement. |
| Water Damage | Low to High | Cracks, holes, improper caulking, failing flashing, clogged gutters | Severity depends on the extent of water penetration and resulting damage to underlying structure. |
| Loose Panels | Low to Moderate | Age, wind damage, improper installation, settling foundation | Generally straightforward to re-secure; may require additional fasteners or sealant. |
Factors Influencing Siding Repair Complexity
Several factors beyond the type of damage itself contribute to the overall complexity of a siding repair job. A thorough understanding of these factors will help you determine whether you possess the necessary skills and resources to handle the project independently.
The size of the damaged area is a primary consideration. A small crack is far easier to address than extensive water damage affecting multiple panels. Similarly, the accessibility of the damaged area plays a crucial role. Repairing damage on a second-story gable is inherently more challenging than repairing damage at ground level. The type of siding is another important factor.
Vinyl siding is generally easier to repair than wood or fiber cement siding, which may require specialized tools and techniques.
Tools and Materials for Basic Siding Repairs
Before you begin any siding repair, gather the necessary tools and materials. Having everything on hand will streamline the process and prevent delays. The specific tools and materials will vary depending on the type and extent of the damage, but a basic kit might include:
For most repairs, you’ll need a sturdy ladder, safety glasses, work gloves, a utility knife, a putty knife, a hammer, various nails or screws (matching your siding type), caulk, and possibly wood filler or patching compound. For more extensive repairs, you may also need a saw, a level, and replacement siding panels. Remember to always prioritize safety and use appropriate personal protective equipment (PPE).
DIY Siding Repair
Tackling minor siding damage yourself can save you money and time, but it’s crucial to understand your limitations. This section details feasible DIY projects, providing step-by-step guides and illustrative examples to empower you to confidently handle common siding issues. Remember, safety is paramount; always prioritize personal safety and wear appropriate protective gear. If you’re uncomfortable with any aspect of the repair, calling a professional is always the best option.
Repairing Minor Cracks in Vinyl Siding
Minor cracks in vinyl siding are often easily repairable. These cracks typically occur due to expansion and contraction in varying temperatures, or from minor impacts. Addressing these promptly prevents further damage and maintains your home’s curb appeal. The following steps Artikel a successful repair strategy.
In this topic, you find that The Impact of Climate on Siding Choices is very useful.
- Clean the Crack: Begin by thoroughly cleaning the area around the crack with a mild detergent and water. Remove any loose debris or dirt. Allow the area to dry completely before proceeding.
- Apply Vinyl Caulk: Using a high-quality exterior-grade vinyl caulk that matches your siding color, carefully fill the crack. Apply the caulk smoothly and evenly, ensuring it penetrates the entire crack. A caulking gun will provide more control and precision.
- Smooth the Caulk: Use a wet finger or a putty knife to smooth the caulk, removing any excess and creating a seamless finish. The goal is to make the repair virtually invisible.
- Allow to Dry: Let the caulk dry completely according to the manufacturer’s instructions. This typically takes several hours, depending on temperature and humidity.
- Inspect and Re-apply (If Necessary): Once dry, inspect the repair. If any cracks remain visible, repeat steps 2-4.
Illustrative Description (Imagine an image here): The image would show a close-up of a vinyl siding panel with a small crack. The first panel shows the crack before repair, clean and dry. The second panel depicts the application of the caulk, neatly filling the crack. The final panel showcases the perfectly smoothed and dried caulk, matching the siding’s color and texture, rendering the repair nearly undetectable.
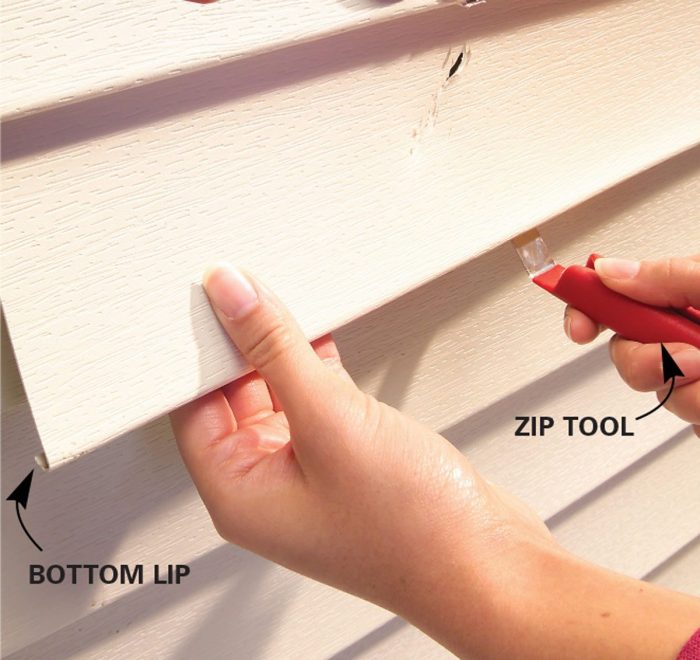
Replacing a Single Damaged Vinyl Siding Panel
Replacing a single damaged vinyl siding panel is a more involved project, but still manageable for many DIY enthusiasts. This is particularly beneficial when a panel has sustained significant damage beyond simple crack repair.
- Gather Tools and Materials: You’ll need a pry bar, utility knife, measuring tape, replacement siding panel (matching your existing siding), and possibly caulk and nails or screws.
- Remove the Damaged Panel: Carefully pry the damaged panel away from the siding using the pry bar. Start at the bottom and work your way up, gently prying the panel away from the underlying structure. Avoid excessive force to prevent further damage.
- Prepare the Replacement Panel: Ensure the replacement panel is the correct size and color. You may need to trim it slightly to fit perfectly.
- Install the New Panel: Carefully slide the new panel into place, ensuring it’s properly aligned with the surrounding panels. Secure it using nails or screws, following the manufacturer’s instructions.
- Caulk (if necessary): Apply caulk along the edges of the new panel to seal it and prevent water penetration. This step is crucial for maintaining the integrity of your siding.
Patching Small Holes in Wood Siding
Small holes in wood siding, often caused by nails, screws, or insect damage, can be effectively patched using wood filler. This process is straightforward but requires attention to detail for a seamless repair.
Illustrative Diagram (Imagine a diagram here): The diagram would depict a section of wood siding with a small hole. Step 1 shows the hole cleaned and prepared. Step 2 illustrates the application of wood filler, slightly overflowing the hole. Step 3 demonstrates the smoothing of the filler after it’s dried, creating a flush surface. Step 4 shows the final result after painting, with the patched area blending seamlessly with the surrounding wood.
First, clean the hole thoroughly, removing any loose wood or debris. Then, apply a high-quality exterior-grade wood filler, slightly overfilling the hole. Once dry, sand the filler smooth, ensuring a flush surface with the surrounding wood. Finally, prime and paint the patched area to match the existing siding color. This ensures a professional and lasting repair.
When Professional Help is Necessary
Deciding whether to tackle siding repair yourself or call a professional is a crucial step. While DIY projects can be rewarding and cost-effective for minor repairs, certain situations demand the expertise and safety measures of a qualified contractor. This section clarifies when professional intervention becomes not just advisable, but essential for protecting your home and your well-being.Cost Comparison of DIY vs.
Professional Siding RepairThe financial implications of choosing between DIY and professional siding repair vary considerably depending on the extent of the damage. Minor repairs, such as replacing a few damaged panels, might be economically feasible as a DIY project. However, extensive damage, like that caused by a storm or significant deterioration, will quickly make professional help the more cost-effective option in the long run, preventing more expensive problems later.
Cost Analysis for Different Damage Scenarios
| Damage Scenario | DIY Estimated Cost | Professional Estimated Cost | Cost Difference Analysis |
|---|---|---|---|
| Replacing a single damaged panel | $50 – $150 (materials and minimal tools) | $200 – $500 (labor and overhead included) | Significant cost difference for a small repair, DIY might be worthwhile if you have the skills. |
| Repairing multiple damaged panels | $150 – $500 (materials and increased labor) | $500 – $1500 (increased labor and potential scaffolding) | Cost difference narrows, but professional efficiency and expertise can still save time and potential errors. |
| Extensive storm damage | Potentially very high cost and impractical, given the scale of the work | $1500 – $10,000+ (depending on the extent of damage and materials) | Professional repair is almost always the most cost-effective and safest approach for large-scale damage. |
| Complete siding replacement | Extremely impractical and risky, likely to result in higher costs due to errors | $5,000 – $20,000+ (depending on house size, materials, and labor) | DIY is not a viable option for this type of project; professional expertise is absolutely necessary. |
Safety Risks Associated with Siding Repair
Working at heights and with power tools presents significant safety risks. Falls from ladders or roofs can lead to severe injuries or even fatalities. Improper use of power tools, such as nail guns or saws, can result in cuts, lacerations, and other injuries. Professional contractors are trained to mitigate these risks, employing appropriate safety equipment and procedures.
They possess the experience and knowledge to navigate complex situations safely and efficiently. For example, a professional might use specialized harnesses and scaffolding to safely work at heights, ensuring worker safety and project success.
Situations Leading to Structural Damage or Water Intrusion
Improper siding repair can have severe long-term consequences. Failure to properly seal gaps and seams can lead to water intrusion, causing mold growth, rot, and structural damage. Incorrect installation of new siding panels can compromise the building’s integrity and lead to expensive repairs down the line. A seemingly minor oversight during DIY repair could ultimately result in significant structural problems and costly remediation.
Consider, for instance, a scenario where improper flashing installation allows water to penetrate behind the siding, leading to extensive rot in the underlying sheathing, necessitating costly repairs that extend beyond just the siding. Professional installers have the expertise to avoid such pitfalls.
Finding and Hiring a Qualified Contractor
Choosing the right contractor for your siding repair is crucial for a successful and long-lasting outcome. A poorly executed repair can lead to further damage, increased costs down the line, and significant headaches. This section will guide you through the process of finding and hiring a qualified professional who can expertly handle your siding needs.Finding a reputable siding contractor requires diligence and a strategic approach.
Don’t just rely on online advertisements; proactive research is key to uncovering truly skilled and trustworthy professionals. Think of it like choosing a surgeon – you wouldn’t just pick the first name in the phone book.
Contractor Selection Criteria
Several factors contribute to identifying a qualified siding contractor. Consider their licensing, insurance, experience, and online reputation. Checking reviews on platforms like Yelp, Google My Business, and Angie’s List can provide valuable insights into previous clients’ experiences. Look for consistent positive feedback, highlighting aspects like professionalism, quality of work, and responsiveness. Also, verify their licensing and insurance; these are essential safeguards protecting you from potential liability issues.
A contractor’s experience with similar projects and the types of siding materials used in your home is also critical. A contractor with a proven track record of working with your specific siding type will likely deliver better results.
Questions to Ask Potential Contractors
Before committing to a contractor, it’s essential to have a clear understanding of their process and capabilities. Asking the right questions will help you assess their expertise and suitability for your project. These questions should cover aspects like project timelines, material sourcing, warranty provisions, and payment schedules. For example, inquire about their experience with your specific siding material, their approach to dealing with unexpected issues during the repair process, and their preferred method of communication.
Furthermore, ask about their cleanup procedures and the steps they take to protect your property during the repair. Finally, don’t hesitate to ask for references from past clients; speaking with them can provide valuable firsthand accounts of the contractor’s work ethic and reliability.
Obtaining Multiple Quotes
Securing multiple quotes from different contractors is a fundamental step in ensuring you receive a competitive price and avoid overpaying. By comparing quotes, you can identify any discrepancies in pricing or scope of work. Make sure the quotes are detailed and include all aspects of the repair, from materials to labor costs. Don’t just focus on the lowest price; consider the overall value proposition, taking into account the contractor’s reputation, experience, and warranty offerings.
Comparing quotes allows you to make an informed decision based on a comprehensive understanding of your options. Remember, the cheapest option isn’t always the best; prioritize quality and reliability over solely focusing on cost.
Key Elements of a Siding Repair Contract
A well-defined contract is the cornerstone of a successful siding repair project. It protects both you and the contractor, outlining the scope of work, payment terms, and other crucial details. The contract should clearly specify the materials to be used, the repair process, the timeline for completion, and the warranty provided. It should also detail the payment schedule, including any upfront deposits and final payment upon project completion.
Crucially, the contract should address any potential unforeseen circumstances or additional costs that may arise during the repair process. A clear dispute resolution mechanism should also be included, outlining how disagreements will be addressed. Consider having a lawyer review the contract before signing to ensure your interests are adequately protected. This detailed contract minimizes misunderstandings and ensures both parties are on the same page.
It provides a legally binding agreement that safeguards your investment and the quality of the work performed.
Preventing Future Siding Problems
Proactive siding maintenance is crucial for preserving your home’s curb appeal and structural integrity. Neglecting regular care can lead to costly repairs down the line, transforming a minor issue into a major headache. By implementing a preventative maintenance plan, you can significantly extend the lifespan of your siding and avoid unexpected expenses. Think of it as an investment in your home’s long-term health.Regular maintenance significantly reduces the likelihood of damage and the need for extensive repairs.
A proactive approach saves both time and money in the long run, preventing small problems from escalating into large, expensive projects. This translates to a more stable budget and peace of mind knowing your home’s exterior is well-protected.
Regular Siding Maintenance Recommendations
Preventative measures are key to keeping your siding in top condition. A simple, consistent routine can make a world of difference. Here’s a checklist to keep your siding looking its best and performing optimally.
- Annual Inspection: Conduct a thorough visual inspection of your entire siding at least once a year, preferably in the spring and fall. Look for cracks, loose boards, damage from pests, or signs of water intrusion. Pay close attention to areas prone to moisture accumulation, such as corners and around windows.
- Cleaning: Wash your siding at least once a year using a gentle pressure washer (low pressure setting is recommended) and a mild detergent. Avoid high-pressure settings, which can damage the siding. For stubborn stains, use a soft-bristled brush.
- Caulk Repair: Inspect and reapply caulk around windows, doors, and other areas where siding meets other building materials. Cracked or missing caulk allows water to penetrate, leading to rot and damage.
- Pest Control: Regularly inspect for signs of insect infestation, such as wood-boring insects or termites. Address any infestations promptly to prevent further damage to your siding and the underlying structure.
- Loose Siding Repair: Immediately address any loose or damaged siding boards. Replacing or securing them promptly prevents further damage and maintains the integrity of your home’s exterior.
The Role of Proper Gutter Maintenance
Proper gutter maintenance is an often-overlooked but critical aspect of siding protection. Clogged gutters can lead to water overflow, causing significant damage to your siding and foundation. Water that isn’t properly channeled away from your home can seep behind the siding, causing rot, mold, and structural damage. This can lead to expensive repairs that could have been avoided with simple maintenance.Regularly cleaning your gutters and downspouts, at least twice a year (spring and fall), ensures that water flows freely away from your home.
This simple step prevents water from pooling against your siding, significantly reducing the risk of water damage. Inspect gutters for any damage or leaks and repair or replace them as needed. Ensure downspouts extend far enough away from your foundation to direct water away from your home.
Choosing Appropriate Siding Materials, Siding Repair When to DIY and When to Call a Pro
The selection of siding materials should be carefully considered based on climate and building type. Different materials offer varying levels of durability, weather resistance, and maintenance requirements. Selecting the right material for your specific environment ensures longevity and minimizes the need for frequent repairs. For example, choosing cedar siding in a humid climate may not be the best choice due to its susceptibility to rot, whereas vinyl might be a more appropriate option.Consider these factors when selecting siding:
- Climate: In regions with harsh winters, materials with excellent resistance to freezing and thawing cycles are crucial. In areas with high humidity, materials resistant to rot and moisture are essential. In areas prone to high winds, durability and impact resistance become paramount.
- Building Type: The style and age of your home should also influence your siding choice. Some materials complement certain architectural styles better than others. For instance, clapboard siding is often a good choice for traditional homes, while modern homes might benefit from more contemporary siding options.
- Budget: Siding materials vary significantly in cost. Factor in the initial cost of materials and installation, as well as the long-term maintenance costs associated with each option.
End of Discussion: Siding Repair When To DIY And When To Call A Pro
Ultimately, deciding between DIY siding repair and hiring a professional hinges on a careful assessment of your skills, the extent of the damage, and your comfort level with heights and power tools. While tackling minor repairs yourself can be a rewarding experience and save you money, complex issues demand the expertise of a qualified contractor to prevent costly mistakes down the line.
Remember, proactive maintenance is key to preventing future problems, saving you both time and money in the long run. So, inspect your siding regularly, address minor issues promptly, and don’t hesitate to call in the pros when needed – your home will thank you for it!